Things to get ready
You should have the following handy when you start.
- vSphere infrastructure
- Windows 2012 R2 ISO up on your virtual infrastructure – and know where it is!
- Windows PID
- You will need to use a utility to copy the profile that you can find here. This is important as Microsoft has been working since Win2K8 to make it difficult to copy a profile – that we do a bunch of customization in, to the default user so after our template is used to provision, new users will get our customization.
- You might consider to use the Microsoft EMET tool to secure your Windows 2012 template but I have not done that yet and am in fact hesitating.
Note: I am not installing the PVSCSI driver in this process. I may add a new article for that, or update this one. Not sure yet. I should also note that I am not using PVSCSI in any of my labs currently but plan on in the near future.
Process
BTW, I am putting what I consider is more than I need to in terms of instructions and screenshots. This is to make sure I can help the people that need more help, but yet I am trying to not put too much so I don’t put off those who don’t need more help. You can always skim through if you only need a little help. Update – Thanks to a comment from @vStorage I thought I would add a little more info on the process. I do more configuration of the virtual machine below then I need to. Some of my config can be done by GPO. However, I like to be careful, and I think a little extra work on the VM before it becomes a template is good. After all, it may not be used on the domain after all.
Virtual Machine and Operating System
- Create a new virtual machine. Use a good name. For example I use wn2k12r2STD-TPL (fifteen character limit here to remember).
- I use a 40 GB drive C:, 1 vCPU, and 4 GB of RAM. Both of those can be changed later after you deploy from this template.
- You should change your Network type to VMXNET3, and attach the Win2K12R2 ISO. See below for an example of what this should look like.

- Note: this is the time we would do PVSCSI if we were doing that. I will add that later but for now we will not cover it off.
- Once we have this virtual machine created, we need to make some changes before we power it on. So right+click on the VM and select Settings and change to VM Options.
- We need to Enable the next boot to enter BIOS setup, and we need to Disable logging. See below for what this should look like.

- Before we power up, I like to use the Tags and Notes to identify this VM. I find this useful, especially in big environments.

- Now we can power up. Do that and than use the right+click to open a console. You should see the BIOS when you get the console open.

- Now change to Advanced, and than I/O Device Configuration.
- We want to disable the Serial, Parallel ports, and the Floppy controller. Note, if we were doing the PVSCSI we would have to disable the floppy controller after the VM had the OS installed and running as the driver for PVSCSI is floppy based.

- Now you can hit F10 to Save and Exit and you should boot right to the OS install. If it doesn’t then when that happens to me it is due to my forgetting to connect the ISO. You can change to the vSphere Web Client and connect the CD in the VM settings area and by the time you return to the Console it should be installing. You may have to hit the Send Ctrl+Alt+Delete button to help.
- The first place the OS stops and waits for you is seen below.

- You can just hit Next to continue.
- Of course that assumes you can actually mouse over to Next and click. I do not have much luck with that and I find that the TAB key is more efficient – of course as no Tools installed yet to help!
- You will need to enter a license. I have to type it in as I am not able to do copy and paste successfully!
- The next screen gives you a choice between installing Server Core, or Server with a GUI. I suggest that you do the Server with a GUI. It is more familiar and you can change to the Server Core later if necessary.

- Again, the TAB key will help, and the arrow keys.
- Accept the license and let’s go.
- In the next screen you will be prompted to select a Type of Installation.

- I was confused the first time I used this screen and I used the default choice which was wrong. Not sure why it let me do that. So make sure to use the Custom choice.
- The next screen will ask you about where to install Windows. We are not using PVSCSI so the disk is visible and we can actually hit Next. If we were using PVSCSI I believe this is where we would load the required driver disk to see the disk. (BTW, the floppy image is on a datastore. You will need to browse to it via VM Settings, Floppy drive, Use existing floppy image, vmimages, floppies, and than select and use pvscsi-Windows2008.flp file.)


- Like the screen says, there may be several restarts.
- We will need to add a password to the administrator account.
Now we are done with the creation of the virtual machine, and install of the OS. We now need to configure Win2K12R2.
OS Configuration – VMware Tools
I generally want to get VMware Tools installed and working so we can work a little easier (meaning that your mouse works now!
- We need to log in.
- Once you are logged in, you will be in the Server Manager. Change over to the vSphere Web Client and start the install of VMware Tools. You will see the option for that on the Summary tab for the VM. You can also find it when you right+click and select All vCenter Actions, followed by Guest OS and finally selecting Install VMware Tools. See both of these options below.

- Once you select you will see the option below.

- I have had some odd experiences installing VMware Tools in Win2K12R2. Sometimes it works best if you can click on the popup of how to handle the CD message. Sometimes you can close and open the Console to make things work a bit better. But this is fustrating. In Win2K8 and Win2K8R2 this was manageable since the install could be unattended and just restart. But for whatever reason I cannot do that any longer with Win2K12.
- The best advice for this is stop the install (unmount is the term) and start it again if necessary. Than use the TAB button. Use it to move to the Server Manager in the task bar. Than use the arrow keys to arrow over to the Explorer option, and than use the TAB and arrow keys to maneuver through the Explorer until you can select the VM CD.

- Now you can use the Return key to start the process. Again the TAB key will help enormously and before you know it the mouse will work nice. Restart when prompted.
OS Configuration – Tweaks and Tuning
In this phase we tweak the OS and get it ready for a wide range of potential use. Meaning this is the template that is most general. It will be used to make other templates that are more specific – such as SQL. The changes below are the ones I make, and think useful but in this section you make the changes that work best for you and your organization.
- We need to log in again so we can start making changes. Yes, our mouse should work good now!
- I like to get the Date / Time right first. So first do the Time Zone. Click on the Clock in the taskbar and select Change date and time settings …
- When we first started all of this you may have noticed that the time of the VM was way off. In fact it was in Zulu or Universal Time because the host time was when the VM started. But now with the right Timezone it should be the right time. If not, your ESXi host may have the wrong time.
- I also like to have the 24 Hour clock in use so this is when I do that change (Change date and time, Change calendar settings, followed by changing to the Time tab).
- We should be back in the Server Manager now. Use the Local Server setting in the top left corner and you will see something like below.

- We will make a number of changes here.
- Lets start in the top right – we want to work with Manage Server Manager Properties.

- Literally only one thing to change. We want to select the checkbox for Do not start Server Manager automatically at logon. Don’t forget it is in the task bar all of the time – it has a toolbox in the icon.
- Now we want to get fully patched. Again in the top right, we can see Windows Update, and it shows as Not configured. Configure it as appropriate in your world.
- Now update until there is no more patches. Reboot as necessary. BTW, the way I reboot is to right+click on the bottom left corner where you see the funny Windows icon. Than use Shut down or sign out and select Restart. This is a very powerful Right Click!

- See all of the choice on this menu? Very handy.
- Once you restart, and log back in, please start up the Server Manager again. It is the first icon in your task bar.
- Select Local Server again.
- You should start with Computer name and change it to match your VM name. You will be limited to 15 characters and that is a little tight so there may be a change. Restart later.
- You can use the Advanced option here on System Properties (found in Server Manager by clicking on Computer Name) to tweak the Performance in Visual Effects for Adjust for best performance.

- Also on the Advanced tab you can change the Startup and Recovery settings so that the Time to display is changed from 30 to 5. Some people will deselect the option to Automatically restart here but it is something rather to think about.
- While in here remove the swap file – we will add it back later (found in Performance Settings / Advanced).
- Now tweak the Firewall if necessary.
- Do you need to change the Remote Management option – I suggest not if you are not sure.
- You very likely need to change the Remote Desktop option. To add users (or even better groups) it is a little hard if you are not in the domain. If you cannot, during deployment from the template when the server is added to the domain you can manage the users (using for example Restricted Groups).
- We will tweak the network now. We likely do not need QoS Packet Scheduler or TCP/IP v6. By the way, when you are back in Server Manager if you do not see what you think you should, than use the Refresh button at the top of the screen and it will update things so they look more appropriate. You can click on the IPv4 in Ethernet0.
- Windows Update may show never updated but it has been so ignore that.
- We generally want to enable Windows Error Reporting and Customer Experience Improvement Program. Both of these end up helping users and we are users so that is good!
- Often people will change IE Enhanced Security Configuration to off. I am turning it off for Administrators.
- Now we should add features. Scroll to the bottom of the Server Manager page.

- Now you can select Add Roles and Features from under the Tasks menu.
- Roles is where you would add things like IIS.
- I like to add Telnet Client as a feature to help with testing. This is where you might add things like .NET or IPAM.
- Now leave Server Manager.
- I like to pin IE to my Task Bar. So click on the Window icon in the bottom left. This will change your desktop to Aero.
- Now right+click on IE and select Pin to taskbar. Now return to the normal desktop.
- Right+Click on the Window icon in the lower left corner and select Control Panel, followed by Hardware.
- We want to use High performance in the power plan. You can also set the Turn off Display here to never.
- Now start IE and save the home page as About:blank.
- We need to make a change at the command line before we restart. So right + click on the Windows icon at the lower left and select Command Prompt (Admin).
- Use the following command at the command line.
powercfg -h off
- We should disable the index on drive C:. Use Explorer to explore This PC and right+click on drive C: and select Properties. You will see at the bottom of the screen the option to disable indexing.
- Now we should defragment the drive. This option is on the Tools tab.: and select the Optimize option.
- While you are here you should disable the weekly optimize option as it is not necessary.
- Often people will want to lower or disable the User Account Settings. You can do that by right+click on the Windows icon in lower left corner and select Control Panel, followed by System and Security, than select Change User Account Control Settings. Chose the setting that is best for you.
- Now we should restart.
Configuration – Installing software
We only install software here that we really need and is useful for most users. Some of what I install is listed below. Remember this template is general and will be used to make the SQL template (with the addition of SQL) or any other software. So software that will be used by most users like – anti – malware, Acrobat Reader, maybe some helpdesk or troubleshooting tools should be installed..
- Bginfo – see this for help.
- Acrobat Reader – make sure to open it to accept the EULA and update if necessary.
- Google Chrome
- Autoruns – a great tool to make sure you know what starts with your server.
- Process Explorer – a great tool for troubleshooting.
- 7-Zip – from here more flexible than what is built in – for example can extract ISO.
- Thanks to StuartM I now suggest installing the Sysmon utility which you can find here. You may not want it running all of the time but you might.
- Generally by now I am prompted to activate the Microsoft license. I do let it activate. If you don’t you may have some issues with sysprep. You can see more about this in this article.
Note: For things like Chrome and Acrobat they will install fine since they have installers and they can be found on the Aero Desktop as you might expect. For things like BgInfo and Autoruns which have no installer it is more complex. Use the info in the BgInfo article to help. Basically you will create a Utilities program group for them and install them manually. This is an example of software that is harder to install via GPO since they have no MSI.
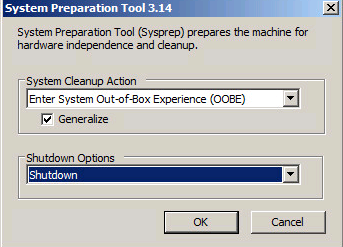
Ready to make it a template?
We are ready to make this virtual machine a template now. If you have connected it to the domain previously, for reasons such as getting the GPO’s to help configure it you should remove it from the network now.
- Enable the swap file.
- Start Server Manager, select Local Server
- Click on Workgroup, than select Advanced
- Select Settings in Performance.
- Now select Advanced and select Change in the Virtual Memory section.
- You can select Automatically manage paging file size for all drives if that works for your organization. I should mention that I like to have a separate drive and put the paging file on it.
- If necessary remove this VM from the domain and restart.
- I always like to check Windows Update before I finish and yes, today I did find a bunch of updates that I did no find earlier. So I update and restart as necessary.
- Disconnect the ISO and reset to Client Device.
- Remove the backup copies of the patches – use this command – dism /online /cleanup-image /StartComponentCleanup /ResetBase
- Make sure you are really ready to proceed!
- We now need to manage the profile
- We first install the Copy Profile tool – called DefProf.
- We use it to copy my profile to the Default Profile – unzip, and execute defprof your_account_name and you are done.
- When that is done we remove the tool,
- And shut the VM down.
- Once the VM is shut down we are ready to turn it into a template.
- I generally now do an update in the Notes section to account for what I have done.

- Now we use right+click on the VM, select All vCenter Actions and Convert to Template as seen below.

- Done. We now have a Windows 2012 R2 template.
Deploy from Template
I suspect everyone knows how to deploy from this new template but remember that any passwords put into the customization script should be done using the vSphere Client and not the vSphere Web Client. I also suggest using the following commands in the Run Once part of the customization specification.
- powercfg -h off
- bcdedit /timeout 5
I have seen a lot of different things done via Run Once. Scripts for example that install applications, or do inventory related tasks, so remember that and you can use it as you need. Always test your deploy from template. In particular make sure the joining the domain works.
Things to think about
- I believe that if the User Profile Manager tool works for you that it should be purchased.
- If you are doing a template that has a bunch of drive letters – like a SQL server, you will lose the order of those drive letters after you deploy. It can be fixed – problem avoided – if you use the info in this article. Thanks Michael for this!
Updating your Template
You should update your template approximately once every month or so. This will allow you to catch any outstanding patches for the OS as well as application patches. Just convert the template to virtual machine, turn it on, patch, than restart it, and convert it to template. You may consider joining it to your domain to catch new GPO type stuff that may be sticky but remember to remove it from the domain before you turn it back into the template.
Links
I found useful information in a variety of places. In particular at the links below.
- How to build a Windows 2012 VMware Template – here
- In-the-Lab: Windows Server 2008 R2 Template for VMware – here
- Microsoft Windows Server 2012 Tips – here
- Windows Server 2012 R2 Template on ESXi 5.5 vSphere – here
- CopyProfile help from Microsoft – here
- Microsoft EMET 5.0 tool – here
History
I plan on keeping this page updated with what I am using and what works well! I will use this section to update you with what I updated when I do updates.
- v2.4 – 1/4/15 – added some verbage and link to Michael Websters article on Dude Where’s my Drive Letters?
- v2.4 – 11/5/14 – added link to Sysmon – thanks to Stuart for the suggestion.
- v2.31 – 8/10/14 – added the link to the EMET tool.
- v2.3 – 7/27/14 – added the command to remove the backup copies of Windows Update patches – thanks to Andreas for this.
- v2.2 – 7/20/14 – miscellaneous grammar and spelling updates.
- v2.1 – 7/18/14 – updated with DefProf instead of User Profile Manager 2.6.
- v2.0 – 6/14/14 – updated with updated process and new tool (thanks to Chip for the idea on using the tool).
- v1.3 – 5/26/14 – updated various areas to make it smoother and more clear.
- v1.2 – 5/25/14 – don’t use the Update suggestions above. Found some odd stuff when updating Win2K12 templates so I need to confirm things.
- v1.2 – 5/18/14 – miscellaneous grammar and spelling plus some small clarification.
- v1.1 – 5/18/14 – added info on process (thanks @vStorage) and info on BGInfo (thanks @seanpmassey).
- v1.0 – 5/17/14 – first published.
As always, comments welcome and in fact appreciated! Also, if you have suggestions on how to make this better let me know.
Michael