Infrastructure Land

Infrastructure Land

Windows 2008 R2 cluster Issue with Quorum drive to a new drive on SAN migration

Check out these two links.  Everything should work… but it doesn’t always.

http://www.ryanjadams.com/2011/07/move-cluster-quorum/#axzz3T5HU9X6N

http://blogs.technet.com/b/hugofe/archive/2012/07/04/windows-2008-2008-r2-san-migration.aspx

Shutdown the cluster

– Disconnect the iSCSI connections

– Move the LUNS on the storage side.

– Offline the old LUNS

– Connect a node to the new storage, check disks appear in disk management as ‘reserved’

– Start the cluster, make sure everything is OK then apply to other nodes.

I added a shutdown of one of the nodes in one of the following steps.

  1. From cluster manager,
  2. right click on the cluster
  3. go to More Actions,
  4. select Configure cluster Quorum Settings.
  5. Change from Node and Disk Majority and switch to only Node Majority.
  6. Once that is complete, disconnect the old LUN from the cluster.
  7. Add the new LUN to the cluster
  8. Go back to quorum configuration and switch back to node and disk majority.

Note:

The cluster software writes a disk signature to each drive (LUN) and that is how it keeps track of them.  If you preserve the complete contents of the LUNs, it should not have any issues recognizing them on a different IQN.

CREATE A READY TO DEPLOY WINDOWS 2008 R2 TEMPLATE – Repost

source: http://www.skypointconsulting.com/create-a-new-vmware-vm-with-the-converted-vmdk/

Here is a quick way to get a generalized VM up and running on your favorite hypervisor:

  1. Install your OS
  2. Install virtualization tools (VMware Tools, XenTools, etc.)
  3. Install patches and make necessary OS/System changes
  4. Run C:WindowsSystem32sysprepsysprep.exe
    • Select Enter System Out-of-Box Experience (OOBE)
    • Select Shutdown
    • Click OK

create-sysprep-2008r2-1

  1. After the VM has been shutdown, convert it to a template
  2. To test, create a new VM from the template
  3. At boot up, Windows setup will begin
  4. When prompted, complete the setup wizard and begin using your VM

create-sysprep-2008r2-2

Microsoft Releases iSCSI Software Target 3.3 to Windows Server 2008 R2 Users – Reposted

Microsoft Releases iSCSI Software Target 3.3 to Windows Sever 2008 R2 Users

Microsoft released on Monday iSCSI Software Target 3.3, a Windows Server 2008 R2 addition that allows for shared block storage in storage area networks using the iSCSI protocol.

According to Microsoft’s announcement, iSCSI Software Target 3.3 is the first release that can be used in a production environment. The product enables “storage consolidation and sharing on a Windows Server by implementing the iSCSI (Internet Small Computer Systems Interface) protocol, which supports SCSI-block access to [a] storage device over a TCP/IP network,” according to the product overview at Microsoft’s Download Center.

This type of storage architecture offers a number of benefits, according to the product overview. It can be used to achieve high availability with Microsoft’s Hyper-V hypervisor using the “live migration” feature. Storage for application servers can be consolidated, including on a Windows failover cluster. Finally, Microsoft iSCSI Software Target 3.3 supports the remote booting of diskless computers “from a single operating system image using iSCSI.”

Microsoft’s team ran this release the software through extensive testing, particularly with Windows Server failover clusters and Hyper-V, according to the announcement. One scenario involved using Microsoft iSCSI Software Target in a “two-node Failover Cluster,” with 92 Hyper-V virtual machines storing data to one of the nodes. The team introduced a failure in the main node and found that all 92 virtual machines switched to the second node without a noticeable effect on the underlying application.

Microsoft is recommending using Service Pack 1 with Windows Server 2008 R2 for this release of Microsoft iSCSI Software Target. The product can be installed in a Hyper-V virtual machine. It doesn’t work with a core installation of Windows Server 2008 R2.

About the Author

Kurt Mackie is senior news producer for the 1105 Enterprise Computing Group.

WINDOWS 2008 R2 REMOTE DESKTOP AND XENAPP 6 TUNING TIPS UPDATE (Repost)

Following the great article Terminal Server & XenApp Tuning Tips published on this website by Pierre Marmignon, this article defined all tips that I’ve found, test and validate for tuning Windows 2008 R2 and XenApp6.

Source: CitrixTools.Net

Please note that :
–       These informations are provided “as is” and that using these tips is at your own risks.
–       All this tuning tips have been tested and validated only on VMs running on Vmware Vsphere 4, let us know your feeback related to any other platform (either Hypervisor or physical server).
Windows 2008 R2 OS Tuning Tips for Remote Desktop Service and XenApp 6
 
Registry Hive
Value
Type
Data
Purpose(s)
HKLMSYSTEMCurrentControlSetServicesTcpipparameters
 KeepAliveTime
 REG_DWORD
180000
Determines how often TCP sends keep-alive transmissions
HKLMSYSTEMCurrentControlSetServicesTcpipparameters
 KeepAliveInterval
 REG_DWORD
 100
Determines how often TCP repeats keep-alive transmissions when no response is received
HKLMSYSTEMCurrentControlSetServicesTcpipparameters
 TcpMaxDataRetransmissions
 REG_DWORD
 10
Determines how many times TCP retransmits an unacknowledged data segment on an existing connection
HKLMSystemCurrentControlSetServicesLanmanServerParameters
 MaxWorkItems
 REG_DWORD
 512
Server Service Optimization
HKLMSystemCurrentControlSetServicesLanmanServerParameters
 MaxMpxCt
 REG_DWORD
 2048
Server Service Optimization
HKLMSystemCurrentControlSetServicesLanmanServerParameters
 MaxFreeConnections
 REG_DWORD
 100
Server Service Optimization
HKLMSystemCurrentControlSetServicesLanmanServerParameters
 MinFreeConnections
 REG_DWORD
 32
Server Service Optimization
HKLMSystemCurrentControlSetServicesLanmanWorkstationParameters
 UtilizeNTCaching
 REG_DWORD
 0
Disable Caching
HKLMSYSTEMCurrentControlSetServicesMRXSmbParameters
 OplocksDisabled
 REG_DWORD
 1
Disables Opportunistic Locking
HLMSYSTEMCurrentControlSetServicesLanmanworkstationParameters
 UseOpportunisticLocking
 REG_DWORD
 0
Disables Opportunistic Locking
HKLMSYSTEMCurrentControlSetServicesLanmanserverParameters
 EnableOplocks
 REG_DWORD
 0
Disables Opportunistic Locking
HKLMSYSTEMCurrentControlSetServicesTcpipparameters
EnableRSS
 REG_DWORD
0
Disable Receive Side Scaling
HKLMSYSTEMCurrentControlSetServicesTcpipparameters
EnableTCPA
 REG_DWORD
0
Disable TCP-acceleration
HKLMSYSTEMCurrentControlSetServicesTcpipparameters
EnableTCPChimney
 REG_DWORD
0
Disable TCP Chimney Offload
HKLMSYSTEMCurrentControlSetServicesLanmanWorkstationParameters
DisableBandwidthThrottling
 REG_DWORD
1
The default is 0. By default, the SMB redirector throttles throughput across high-latency network connections in some cases to avoid network-related timeouts. Setting this registry value to 1 disables this throttling, enabling higher file transfer throughput over high-latency network connections
HKLMSystemCurrentControlSetServicesLanmanWorkstationParameters
 MaxThreads
 REG_DWORD
 17
Maximum Concurrent Threads
HKLMSYSTEMCurrentControlSetServicesLanmanWorkstationParameters
DisableLargeMtu
 REG_DWORD
0
The default is 1. By default, the SMB redirector does not transfer payloads larger than approximately 64 KB per request. Setting this registry value to 0 enables larger request sizes, which can improve file transfer speed.
HKLMSYSTEMCurrentControlSetServicesTcpipparameters
 EnableWsd
 REG_DWORD
 0
The default is 1 for client operating systems. By default, Windows Scaling Diagnostics (WSD) automatically disables TCP receive window auto tuning when heuristics suspect a network switch component might not support the required TCP option (scaling). Setting this registry setting to 0 disables this heuristic and allows auto tuning to stay enabled. When no faulty networking devices are involved, applying the setting can enable more reliable high-throughput networking via TCP receive window auto tuning. For more information about disabling this setting
HKLMSYSTEMCurrentControlSetServicesLanmanWorkstationParameters
FileInfoCacheEntriesMax
 REG_DWORD
32768
The default is 64 with a valid range of 1 to 65536. This value is used to determine the amount of file metadata that can be cached by the client. Increasing the value can reduce network traffic and increase performance when a large number of files are accessed
HKLMSYSTEMCurrentControlSetServicesLanmanWorkstationParameters
DirectoryCacheEntriesMax
 REG_DWORD
4096
The default is 16 with a valid range of 1 to 4096. This value is used to determine the amount of directory information that can be cached by the client. Increasing the value can reduce network traffic and increase performance when large directories are accessed
HKLMSYSTEMCurrentControlSetServicesLanmanWorkstationParameters
FileNotFoundCacheEntriesMax
 REG_DWORD
32768
The default is 128 with a valid range of 1 to 65536. This value is used to determine the amount of file name information that can be cached by the client. Increasing the value can reduce network traffic and increase performance when a large number of file names are accessed.
HKLMSYSTEMCurrentControlSetServicesLanmanWorkstationParameters
MaxCmds
 REG_DWORD
32768
The default is 15. This parameter limits the number of outstanding requests on a session. Increasing the value can use more memory, but can improve performance by enabling deeper request pipelining. Increasing the value in conjunction with MaxMpxCt can also eliminate errors encountered due to large numbers of outstanding long-term file requests, such as FindFirstChangeNotification calls. This parameter does not affect connections with SMB 2 servers.
Windows 2008 CPU Tuning (for VM only)
 
Because I’m working with VMware VSphere Server 4, I Supposed that the Hypervisor manage my processor and I don’t want to have any CPU management in the VM, I force all my VM to the “min  Power Scheme“  (High Performance) with the following command “owercfg -setactive scheme_min“
And force my Processor Performance Boost Policy, Minimum and Maximum Processor Performance State and Processor Performance Core Parking Maximum and Minimum Cores to the maximum. (http://www.microsoft.com/whdc/system/sysperf/Perf_tun_srv-R2.mspx)
The following commands set Processor Performance Boost Policy to 100 percent on the current power plan:
Powercfg -setacvalueindex scheme_current sub_processor 45bcc044-d885-43e2-8605-ee0ec6e96b59 100
Powercfg -setactive scheme_current
The following commands set Processor Performance State parameters to 100 %
Powercfg -setacvalueindex scheme_current sub_processor 893dee8e-2bef-41e0-89c6-b55d0929964c 100
Powercfg -setactive scheme_current
Core parking is a new feature in Windows Server 2008 R2. The processor power management (PPM) engine and the scheduler work together to dynamically adjust the number of cores available to execute threads, to turn off core parking, set the Minimum Cores parameter to 100 percent by using the following commands:
Powercfg -setacvalueindex scheme_current sub_processor bc5038f7-23e0-4960-96da-33abaf5935ec 100
Powercfg -setactive scheme_current
Additional Windows Explorer Tuning
 
Registry Hive
Value
Type
Data
Purpose(s)
HKLMSOFTWAREMicrosoftWindowsCurrentVersionPoliciesExplorer
 UseDesktopIniCache
 REG_DWORD
 1
HKLMSOFTWAREMicrosoftWindowsCurrentVersionPoliciesExplorer
 NoRemoteRecursiveEvents
 REG_DWORD
 1
HKLMSOFTWAREMicrosoftWindowsCurrentVersionPoliciesExplorer
 NoRemoteChangeNotify
 REG_DWORD
 1
HKLMSOFTWAREMicrosoftWindowsCurrentVersionPoliciesExplorer
 StartRunNoHOMEPATH
 REG_DWORD
 1
HKLMSOFTWAREMicrosoftWindowsCurrentVersionPoliciesExplorer
 NoRecentDocsNetHood
 REG_DWORD
 1
HKLMSOFTWAREMicrosoftWindowsCurrentVersionPoliciesExplorer
 NoDetailsThumbnailOnNetwork
 REG_DWORD
 1
HKLMSystemCurrentControlSetServicesMRXSmbParameters
 InfoCacheLevel
 REG_DWORD
 16
HKCR*shellexPropertySheetHandlersCryptoSignMenu
 SuppressionPolicy
 REG_DWORD
 1048576
HKCR*shellexPropertySheetHandlers{3EA48300-8CF6-101B-84FB-666CCB9BCD32}
 SuppressionPolicy
 REG_DWORD
 1048576
HKCR*shellexPropertySheetHandlers{883373C3-BF89-11D1-BE35-080036B11A03}
 SuppressionPolicy
 REG_DWORD
 1048576
HKLMSOFTWAREMicrosoftWindowsCurrentVersionexplorerSCAPI
 Flags
 REG_DWORD
 1051650
HKLMSYSTEMCurrentControlSetControlSession Manager
 SafeDllSearchMode
 REG_DWORD
 1
HKLMSYSTEMCurrentControlSetControlSession Manager
 SafeProcessSearchMode
 REG_DWORD
 1
Windows 2008 R2 – RDP Tuning  
Registry Hive
Value
Type
Data
Purpose(s)
HKLMSYSTEMCurrentControlSetControlTerminal ServerWinStationsRDP-TcpUserOverrideControl PanelDesktop
 AutoEndTasks
 REG_SZ
 1
Determines whether user processes end automatically when the user either logs off.
HKLMSYSTEMCurrentControlSetControlTerminal ServerWinStationsRDP-TcpUserOverrideControl PanelDesktop
 WaitToKillAppTimeout
 REG_SZ
 20000
Determines how long the system waits for user processes to end after the user attempts to log off
HKLMSYSTEMCurrentControlSetControlTerminal ServerWinStationsRDP-TcpUserOverrideControl PanelDesktop
 MenuShowDelay
 REG_SZ
 10
Changes the Start menu display interval
HKLMSYSTEMCurrentControlSetControlTerminal ServerWinStationsRDP-TcpUserOverrideControl PanelDesktop
 CursorBlinkRate
 REG_SZ
 -1
Specifies how much time elapses between each blink of the selection cursor
HKLMSYSTEMCurrentControlSetControlTerminal ServerWinStationsRDP-TcpUserOverrideControl PanelDesktop
 DisableCursorBlink
 REG_DWORD
 1
Enables / Disables Cursor Blink
HKLMSYSTEMCurrentControlSetControlTerminal ServerWinStationsRDP-TcpUserOverrideControl PanelDesktop
 DragFullWindows
 REG_SZ
 0
Specifies what appears on the screen while a user drags a window / Only the outline of the window moves
HKLMSYSTEMCurrentControlSetControlTerminal ServerWinStationsRDP-TcpUserOverrideControl PanelDesktop
 SmoothScroll
 REG_DWORD
 0
Scrolls using smooth scrolling
HKLMSYSTEMCurrentControlSetControlTerminal ServerWinStationsRDP-TcpUserOverrideControl PanelDesktop
 Wallpaper
 REG_SZ
 (none)
Sets Wallpaper to “None”
HKLMSYSTEMCurrentControlSetControlTerminal ServerWinStationsRDP-TcpUserOverrideControl PanelDesktopWindowsMetrics
 MinAnimate
 REG_SZ
 0
Disabled. Window does not animate while being resized
HKLMSYSTEMCurrentControlSetControlTerminal ServerWinStationsRDP-TcpUserOverrideControl PanelDesktop
 InteractiveDelay
 REG_DWORD
 40
Optimizes Explorer and Start Menu responses Times
XenApp 6.0 – ICA tuning
  
HKLMSYSTEMCurrentControlSetControlTerminal ServerWinStationsICA-TcpUserOverrideControl PanelDesktop
 AutoEndTasks
 REG_SZ
 1
 Determines whether user processes end automatically when the user either logs off.
Registry Hive
Value
Type
Data
Purpose(s)
HKLMSYSTEMCurrentControlSetControlTerminal ServerWinStationsICA-TcpUserOverrideControl PanelDesktop
 WaitToKillAppTimeout
 REG_SZ
 20000
Determines how long the system waits for user processes to end after the user attempts to log off
HKLMSYSTEMCurrentControlSetControlTerminal ServerWinStationsICA-TcpUserOverrideControl PanelDesktop
 MenuShowDelay
 REG_SZ
 10
Changes the Start menu display interval
HKLMSYSTEMCurrentControlSetControlTerminal ServerWinStationsICA-TcpUserOverrideControl PanelDesktop
 CursorBlinkRate
 REG_SZ
 -1
Specifies how much time elapses between each blink of the selection cursor
HKLMSYSTEMCurrentControlSetControlTerminal ServerWinStationsICA-TcpUserOverrideControl PanelDesktop
DisableCursorBlink
REG_DWORD
 1
Enables / Disables Cursor Blink
HKLMSYSTEMCurrentControlSetControlTerminal ServerWinStationsICA-TcpUserOverrideControl PanelDesktop
 DragFullWindows
 REG_SZ
 0
Specifies what appears on the screen while a user drags a window / Only the outline of the window moves
HKLMSYSTEMCurrentControlSetControlTerminal ServerWinStationsICA-TcpUserOverrideControl PanelDesktop
 SmoothScroll
 REG_DWORD
 0
Scrolls using smooth scrolling
HKLMSYSTEMCurrentControlSetControlTerminal ServerWinStationsICA-TcpUserOverrideControl PanelDesktop
 Wallpaper
 REG_SZ
 (none)
Sets Wallpaper to “None”
HKLMSYSTEMCurrentControlSetControlTerminal ServerWinStationsICA-TcpUserOverrideControl PanelDesktopWindowsMetrics
 MinAnimate
 REG_SZ
 0
Disabled. Window does not animate while being resized
HKLMSYSTEMCurrentControlSetControlTerminal ServerWinStationsICA-TcpUserOverrideControl PanelDesktop
 InteractiveDelay
 REG_DWORD
 40
Optimizes Explorer and Start Menu responses Times
Please note that using these tips is at your own risks.
All these tips have been test with XenApp6 server running on VMware Vsphere 4 and should be test on your own environment.
Sources :
Author : Julien Sybille
CCEA & CCA XenDesktop
14 comments
By: Jonathan Pitre (JakeLD)
10 December, 2010

Very nice article Julien!

According to Thomas Koetzing paper on “Optimizing Logon and Logoff 1.4” available at http://www.thomaskoetzing.de/index.php?option=com_docman&task=doc_download&gid=135

the registry key HKLMSYSTEMCurrentControlSetControlTerminal ServerWinStationsRDP-TcpUserOverride dosen’t work anymore with Windows 2003 and 2008/2008 R2 I assume.

Here what he had to say on page 22: “With Windows 2003 those global keys don’t work anymore and has to be set on a per user basis.”

I tested it my self with existing profiles and it didn’t work…but I just read this morning that the profile must be NEW. So who’s right, you or Thomas ? 🙂

Also I suggest the following registry keys:

HKLMSSYSTEMCurrentControlSetControlProcessor
Key: “Capabilities” (dword)
Value: 0007e666
http://support.microsoft.com/kb/2000977

HKLMSYSTEMCurrentControlSetServicesTCPIPParameters
Key: “DisableTaskOffload” (dword)
Value: “1”

http://support.microsoft.com/kb/904946
http://support.citrix.com/article/CTX117491

Regards,

Jonathan Pitre

By: Helmut Hauser (Houzer)
16 December, 2010

Other tuning options are:

1st) Turn off TCP Offloading (at the NIC AND the OS)

OS:
%SYSTEMROOT%SYSTEM32
etsh.exe int tcp set global chimney=disabled
%SYSTEMROOT%SYSTEM32
etsh.exe int tcp set global rss=disabled

[HKEY_LOCAL_MACHINESYSTEMCurrentControlSetServicesTcpipParameters]
“EnableRSS”=dword:00000000
“EnableTCPChimney”=dword:00000000
“EnableTCPA”=dword:00000000
“DisableTaskOffload”=dword:00000001

2nd) If dealing with APP-V 4.6 64 Bit RDS Client on W2K8R2 this one could be for you [SCCM related]:

[HKEY_LOCAL_MACHINESOFTWAREMicrosoftSoftGrid4.5ClientConfiguration]
“RequireAuthorizationIfCached”=dword:00000000
[HKEY_LOCAL_MACHINESOFTWAREMicrosoftSoftGrid4.5ClientNetwork]
“AllowDisconnectedOperation”=dword:00000001
“Online”=dword:00000000
“DOTimeoutMinutes”=dword:ffffff
“LimitDisconnectedOperation”=dword:00000000
[HKEY_LOCAL_MACHINESOFTWAREMicrosoftSoftGrid4.5ClientPermissions]
“ToggleOfflineMode”=dword:00000000

3rd)

other optimizations:

[HKEY_LOCAL_MACHINESYSTEMCurrentControlSetServicesTcpipParameters]
“EnablePMTUBHDetect”=dword:00000001
“KeepAliveTime”=dword:00007530
“KeepAliveInterval”=dword:00001388
“TcpMaxDataRetransmissions”=dword:00000005
“EnableBcastArpReply”=dword:00000001
“DisableTaskOffload”=dword:00000001

[HKEY_LOCAL_MACHINESYSTEMCurrentControlSetServicesLanmanServerParameters]
“TreatHostAsStableStorage”=dword:00000001

[HKEY_LOCAL_MACHINESYSTEMCurrentControlSetControlFileSystem]
“NtfsDisableLastAccessUpdate”=dword:00000001
“DontVerifyRandomDrivers”=dword:00000001
“NtfsDisable8dot3NameCreation”=dword:00000001

[HKEY_LOCAL_MACHINESYSTEMCurrentControlSetControlLsaKerberosParameters]
“MaxTokenSize”=dword:0000FFFF

[HKEY_LOCAL_MACHINESOFTWAREMicrosoftWindowsCurrentVersionPoliciesSystem]
“DelayedDesktopSwitchTimeout”=dword:00000005

[HKEY_LOCAL_MACHINESYSTEMCurrentControlSetControl]
ServicesPipeTimeout”=dword:0001d4c0

[HKEY_LOCAL_MACHINESYSTEMCurrentControlSetServicesBrowserParameters]
“IsDomainMaster”=”FALSE”
“MaintainServerList”=”No”

As always – do NOT use this in a production environment.
Test it in a lab.
Be very careful when touching the autotuning TCP/IP stack. This can backfire.
Talk with the networking gents.

HOW TO CLEAN UP THE WINSXS DIRECTORY AND FREE UP DISK SPACE ON WINDOWS SERVER 2008 R2 WITH NEW UPDATE

// // <![CDATA[
try { jQuery.telligent.evolution.site.configure({baseUrl:'/',monthNames:['Jan','Feb','Mar','Apr','May','Jun','Jul','Aug','Sep','Oct','Nov','Dec'],dayNames:['Sun','Mon','Tue','Wed','Thu','Fri','Sat'],authorizationCookieName:'AuthorizationCookie',defaultErrorMessage:'An error occurred. Please try again or contact your administrator.',defaultMultiErrorMessagePrefix:'The following errors occurred: ',silverlightFileUploadEnabled:true});
jQuery.extend($.fn.evolutionUserFileTextBox.defaults,{removeText:'Remove',selectText:'Select/Upload…',noFileText:'No File Selected'});
jQuery.telligent.evolution.navigationConfirmation.configure({message:'==============================rnUnless you save before leaving this page, you will lose any changes you have made.rn=============================='});
jQuery.telligent.evolution.validation.registerExtensions({passwordInvalidMessage:'Password contains invalid chars …',passwordRegex:'^.*$',emailInvalidMessage:'Your email address is invalid.',emailRegex:'^\w+([-+.]\w+)*@\w+([-.]\w+)*\.\w+([-.]\w+)*$',usernameInvalidMessage:'Your sign in name does not meet the requirements for this site.',usernameRegex:'^[a-zA-Z0-9_\- @\.]+$',emailsInvalidMessage:'One or more emails is invalid',urlInvalidMessage:'URL not in correct format',urlRegex:'^((http|https|mailto|mms):|/|#|~/)'});
jQuery.extend(jQuery.fn.evolutionLike.defaults,{likeText:'Like',unlikeText:'Unlike',modalTitleText:'People who like this',modalShowMoreText:'Show More',whoLikesOtherText:'{user_display_name} likes this’,whoLikesOtherTwoText:’{user_display_name} and 1 other like this’,whoLikesOtherMultipleText:’{user_display_name} and {count} others like this’,whoLikesAccessingText:’You like this’,whoLikesAccessingTwoText:’You and 1 other like this’,whoLikesAccessingMultipleText:’You and {count} others like this’});
jQuery.extend(jQuery.fn.evolutionInlineTagEditor.defaults,{editButtonText:’Edit tags’,selectTagsText:’Select tags’,saveTagsText:’Save’,cancelText:’Cancel’});
jQuery.extend(jQuery.fn.evolutionStarRating.defaults,{titles:[‘Terrible’,’Poor’,’Fair’,’Average’,’Good’,’Excellent’],ratingMessageFormat:’Average rating: {rating} out of {count} ratings.’});
jQuery.extend(jQuery.fn.evolutionModerate.defaults,{moderateLinkText:’moderate’,reportLinkText:’Flag as spam/abuse’,reportedLinkText:’Flagged as spam/abuse’,reportedNotificationMessageText:'{NAME}’s post has been flagged. Thank you for your feedback.’});
} catch(e) { };
// ]]>// // // // //
How to Clean up the WinSxS Directory and Free Up Disk Space on Windows Server 2008 R2 with New Update – Ask Premier Field Engineering (PFE) Platforms – Site Home – Source: TechNet Blogs

It’s finally here! After pages and pages of comments from you requesting the ability to clean up the WinSxS directory and component store on Windows Server 2008 R2, an update is available.

http://support.microsoft.com/kb/2852386

As a refresher, the Windows Server 2008 R2 update is directly related to my previous blog post announcing a similar fix for Windows 7 client.

The Windows 7 version of this fix introduced an additional option to the Disk Cleanup wizard that would cleanup previous versions of Windows Update files. KB2852386 adds a Disk Cleanup option on Windows Server 2008 R2, similar to the Windows 7 update.

What does this mean for Windows Server 2008 R2? After installing this update and prior to being able to perform the cleanup, the Desktop Experience feature must be installed. Why you ask? Disk Cleanup is not installed by default on Windows Server 2008 R2. It is instead a component installed with the Desktop Experience feature.

Why was the update not included as a DISM switch like Windows Server 2012 R2?

This was evaluated, however, due to the amount of changes required and the rigorous change approval process, it was not feasible to back port the functionality this way. Knowing that it would be some time before everyone could upgrade to Windows Server 2012 R2 and based on feedback from an internal survey taken of a subset of enterprise customers, it was determined that this update would still be useful in its Disk Cleanup form, even with the Desktop Experience prerequisite. We hope you agree. However, we are aware that for some of you, the Desktop Experience requirement will be a deal breaker, but decided to release it anyway hoping it will help in some instances.

How can I get the update?

The update is available on Windows Update. It can also be manually downloaded from the Microsoft Update Catalog. The KB article listed above will also direct you to a download link in the Microsoft Download Center.

Let’s Cleanup those Old Windows Update Files!

First, let’s take a look at our starting point. Looking at my Windows 2008 R2 Server with SP1 installed, according to Windows Explorer, the size of my Windows/WinSxS directory is as follows:

The size of the WinSxS directory will vary by server. Some of you will have smaller WinSxS directories, some larger.

Installing the update is just like installing any other update. Just download and double-click on the .msu file:

Installing the update does not require Desktop Experience to be installed beforehand, but if you check your WinSxS directory again, you’ll see there has been no change to the size. This is expected as we need to run Disk Cleanup in order for this to take effect. It also does not require a reboot to install the hotfix.

But…we can’t do anything with what we just installed until we get Disk Cleanup which is installed with the Desktop Experience feature.

When installing Desktop Experience, it does require additional features. Select the button to Add Required Features and click Next and then Install:

A reboot is required to finalize the install.

Click Close and Reboot when prompted.

After we reboot, a Disk Cleanup option can be found under Start –> All Programs –> Accessories –> System Tools:

On launch, Disk Cleanup prompts for the drive you want to clean up:

After clicking Ok, a scan is performed:

Several options are provided for cleanup, including a new option for Windows Update Cleanup:

Just like the Windows 7 cleanup, mileage will vary. Also like Windows 7, the actual cleanup occurs during the next reboot. After the reboot, taking a look at the WinSxS directory, it has shrunk to the following:

Automation

My super knowledgeable scripting cohort Tom Moser wrote a PowerShell script that automates THE ENTIRE PROCESS. Can I get a cheer? Ok. So maybe it is a bit much to expect IT admins to cheer, but can I get an appreciative grunt?  The script certainly beats the alternative of doing this all manually.

You can find the script on the TechNet Script Center here:

http://gallery.technet.microsoft.com/scriptcenter/CleanMgrexeKB2852386-83d7a1ae

What does the script do?

In short, the script does the following:

1) Installs Desktop Experience, if not previously installed, and performs a reboot.

2) Sets the appropriate registry keys to automate the cleanup. The script will cleanup not only previous Windows Update files as well as Service Pack files.

3) The script then initiates the cleanup.

4) If Desktop Experience was not previously installed, the script uninstalls it.

5) Performs final reboot.

For more details, read below.

The script can be run from any directory on the server. It has two parameters: LogPath and a switch called NoReboot. LogPath will allow the user to specify a log location or if none is specified, by default, the script will create a log in the same directory from which the script was executed. NoReboot allows the user to suppress reboots, but will require manual reboots by an administrator.

Note: Make sure to check the log file to verify the process completed successfully and to verify there is no manual interaction required. If the script has completed successfully, the log will end with CleanMgr complete.

The script has several phases, using a registry key to keep track of progress. After initial run, it inserts itself as a scheduled task, which runs as local system. The final phase removes the task.

Depending on pending reboots, etc, we have found that this phase may generate a few reboots. Do not be concerned if the server reboots a few times.

Other Options

Aside from the cleanup mechanism included with this fix, if you have applied SP1 and have not cleaned up afterwards, I’d highly recommend doing so by running the following command from an administrative command prompt:

dism /online /cleanup-image /spsuperseded

or

If you have installed the Desktop Experience feature and thus have the Disk Cleanup utility, you can select the following option to do the same thing:

Specifying the /spsuperceded switch or choosing to remove service pack backup files will remove the ability to uninstall the service pack. If you haven’t done it before, it is certain to free up some space.

The Origins of this Update (Hint: Windows Server 2012 R2)

I’ve mentioned a couple of times that this is a back port. What does that mean? Well, it means that this functionality is already built into a later operating system. In this case, that operating system is Windows Server 2012 R2. Not only do we have several mechanisms to automatically cleanup previous versions of Windows Update files like this update does, we even have the ability to more accurately determine the size of the component store (aka the WinSxS directory).

The command to accurately determine the size of the component store on Windows Server 2012 R2 is as follows:

Dism.exe /Online /Cleanup-Image /AnalyzeComponentStore

Running this command analyzes the component store to determine the size and whether cleanup is recommended. Notice in the screen shot that it provides you with the Windows Explorer reported size and the actual size:

Notice that the component store is much smaller than Windows Server 2008 R2 right out of the gate? This isn’t because I’ve used Features on Demand to remove roles and features. It’s because by default in Windows Server 2012 R2, we compress all unused binaries. Another win for Windows Server 2012 R2!

Looking at the breakdown of the 5.12GB. We see that Shared with Windows accounts for 3.83GB of the 5.12GB. Shared with Windows refers to the size of the files that are hardlinked between the WinSxS directory and the Windows location of the file. Because these hardlinks appear to take up space, but don’t really, we can subtract them from our component store size. Therefore, the actual size of the component store is the total of Backups and Disabled Features plus Cache and Temporary Data or 1.28GB.

But back to our cleanup.

In the above screen shot, it’s stated that component store cleanup is recommended. We can manually cleanup the component store on Windows Server 2012 R2 by running the following command:

Dism.exe /online /Cleanup-Image /StartComponentCleanup

What does this do? When this runs, Windows cleans up the previous versions of the component that was updated. In other words, it is doing exactly what our update does for Windows Server 2008 R2 SP1. It removes previous versions of the files updated by Windows Updates.

After running /StartCompomentCleanup, upon analyzing the size again, we see it is as follows:

So no notable difference really. Largely because we’ve been running this cleanup all along. This same command is run every 30 days as a scheduled task with a time limit of 1 hour.

With the scheduled task however, the task will wait at least 30 days after an updated component has been installed before uninstalling the previous versions of the component. This scheduled task can be found in Task Scheduler under the Task Scheduler LibraryMicrosoftWindowsServicingStartComponentCleanup directory:

More information on this can be found here:  http://technet.microsoft.com/en-us/library/dn251565.aspx

If you’re in all out spring cleaning mode and want to perform super deep cleanup, you can use the /resetbase command with the /startcomponentcleanup to remove all superseded versions of every component in the component store:

Dism.exe /online /Cleanup-Image /StartComponentCleanup /ResetBase

This removes the ability to uninstall any updates applied until this point in time.

And don’t forget the ability to completely remove any role or feature which also reduces the size. Take a look at one of my earlier blogs for more details on Features on Demand:  http://blogs.technet.com/b/askpfeplat/archive/2013/02/24/how-to-reduce-the-size-of-the-winsxs-directory-and-free-up-disk-space-on-windows-server-2012-using-features-on-demand.aspx

Here’s a handy table showing when we introduced the various different cleanup and WinSxS size reductions by operating system:

Operating System Compress Unused WinSxS Binaries Cleanup Previous Windows Update Files Automatically Clean Up Previous Windows Update Files Cleanup All Components Features on Demand
Windows Server 2008 R2 With KB2852386
Windows Server 2012  With KB2821895 x x x
Windows Server 2012 R2 x x x x x

Want more information on how all this works under the covers?

Check out the following series on the AskCore team blog for an in-depth look at servicing improvements on Windows Server 2012 R2:

What’s New in Windows Servicing: Part 1

What’s New in Windows Servicing: Reduction of Windows Footprint : Part 2

What’s New in Windows Servicing: Service Stack Improvements: Part 3 

More on the Desktop Experience Feature

The Desktop Experience feature includes the following components and features:

* Windows Media Player

* Desktop themes

* Video for Windows (AVI support)

* Windows SideShow

* Windows Defender

* Disk Cleanup

* Sync Center

* Sound Recorder

* Character Map

* Snipping Tool

* Ink Support

Most of these are not automatically turned on with the exception of Windows Defender whose service is started after reboot. You’ll likely want to stop the service and disable it after reboot. Not all 3rd party anti-viruses conflict with Windows Defender, but there have been reports that some do.

~ Charity Shelbourne and Tom Moser, Spring cleaning servers since 1998

Update May 15th, 2014

We are aware of a method of copying in the appropriate Disk Cleanup/CleanMgr files into the appropriate location to avoid installing the Desktop Experience. If this were a tested and supported option, we certainly would have included these details in this post and definitely would have used this method to automate the cleanup. However, it was determined early on that this method would not be supported. If you decide to do this, do so at your own risk.

iSCSI configuration in a cluster

Configuring the Microsoft iSCSI target software for use in a cluster

Source: http://clusteringformeremortals.com/2011/03/24/configuring-the-microsoft-iscsi-target-software-for-use-in-a-cluster/

Now that Starwind has stopped offering a free, limited version of their iSCSI target software you might be looking for an alternative for your labs. Microsoft has recently made their iSCSI target software available as part of the Windows Storage Server 2008 R2 download on Tech-Net and MSDN. It is not for use in production and has some of its own licensing restrictions, but it works fine and it is free for Tech-Net and MSDN subscribers.

I recorded some really quick and dirty videos that aim to show you how to configure the iSCSI target and iSCSI initiator software in under 7 minutes. At the end, you will have a shared disk array ready to start your shared storage cluster. Hopefully when I get some more time I’ll actually write these steps out, but in a pinch this will give you the general idea of what needs to be done. There are plenty of other features, but for a lab environment this will do the trick.

http://screencast.com/t/2qUUDvZo6Zka – configuring the iSCSI target software and iSCSI initiator on the client

http://screencast.com/t/7m9ElSIdAbP – configuring the iSCSI initiator….continued

Step-by-Step: Configuring a 2-node multi-site cluster on Windows Server 2008 R2 – Part 1

Source: Clustering for mere mortals

STEP-BY-STEP: CONFIGURING A 2-NODE MULTI-SITE CLUSTER ON WINDOWS SERVER 2008 R2 – PART 1

CREATING YOUR CLUSTER AND CONFIGURING THE QUORUM: NODE AND FILE SHARE MAJORITY

Introduction

Welcome to Part 1 of my series “Step-by-Step: Configuring a 2-node multi-site cluster on Windows Server 2008 R2″. Before we jump right in to the details, let’s take a moment to discuss what exactly a multi-site cluster is and why I would want to implement one. Microsoft has a great webpage and white paperthat you will want to download to get you all of the details, so I won’t repeat everything here. But basically a multi-site cluster is a disaster recovery solution and a high availability solution all rolled into one. A multi-site cluster gives you the highest recovery point objective (RTO) and recovery time objective (RTO) available for your critical applications. With the introduction of Windows Server 2008 failover clustering a multi-site cluster has become much more feasible with the introduction of cross subnet failover and support for high latency network communications.

I mentioned “cross-subnet failover” as a great new feature of Windows Server 2008 Failover Clustering, and it is a great new feature. However, SQL Server has not yet embraced this functionality, which means you will still be required to span your subnet across sites in a SQL Server multi-site cluster. As of Tech-Ed 2009, the SQL Server team reported that they plan on supporting this feature, but they say it will come sometime after SQL Server 2008 R2 is released. For the foreseeable future you will be stuck with spanning your subnet across sites in a SQL Server multi-site cluster. There are a few other network related issues that you need to consider as well, such as redundant communication paths, bandwidth and file share witness placement.

Network Considerations

All Microsoft failover clusters must have redundant network communication paths. This ensures that a failure of any one communication path will not result in a false failover and ensures that your cluster remains highly available. A multi-site cluster has this requirement as well, so you will want to plan your network with that in mind. There are generally two things that will have to travel between nodes: replication traffic and cluster heartbeats. In addition to that, you will also need to consider client connectivity and cluster management activity. You will want to be sure that whatever networks you have in place, you are not overwhelming the network or you will have unreliable behavior. Your replication traffic will most likely require the greatest amount of bandwidth; you will need to work with your replication vendor to determine how much bandwidth is required.

With your redundant communication paths in place, the last thing you need to consider is your quorum model. For a 2-node multi-site cluster configuration, the Microsoft recommended configuration is a Node and File Share Majority quorum. For a detailed description of the quorum types, have a look at thisarticle.

The most common cause of confusion with the Node and File Share Majority quorum is the placement of the File Share Witness. Where should I put the server that is hosting the file share? Let’s look at the options.

Option 1 – place the file share in the primary site.

This is certainly a valid option for disaster recovery, but not so much for high availability. If the entire site fails (including the Primary node and the file share witness) the Secondary node in the secondary site will not come into service automatically, you will need to force the quorum online manually. This is because it will be the only remaining vote in the cluster. One out of three does not make a majority! Now if you can live with a manual step being involved for recovery in the event of a disaster, then this configuration may be OK for you.

Option 2 – place the file share in the secondary site.

This is not such a good idea. Although it solves the problem of automatic recovery in the event of a complete site loss, it exposes you to the risk of a false failover. Consider this…what happens if your secondary site goes down? In this case, your primary server (Node1) will go also go offline as it is now only a single node in the primary site and will no longer have a node majority. I can see no good reason to implement this configuration as there is too much risk involved.

Option 3 – place the file share witness in a 3rd geographic location

This is the preferred configuration as it allows for automatic failover in the event of a complete site loss and eliminates any the possibility of a failure of the secondary site causing the primary node to go offline. By having a 3rd site host the file share witness you have eliminated any one site as a single point of failure, so now the cluster will act as you expect and automatic failover in the event of a site loss is possible. Identifying a 3rd geographic location can be challenging for some companies, but with the advent of cloud based utility computing like Amazon EC2 and GoGrid, it is well within the reach of all companies to put a file share witness in the clouds and have the resiliency required for effective multi-site clusters. In fact, you may consider the cloud itself as your secondary data center and just failover to the cloud in the event of a disaster. I think the possibilities of cloud based computing and disaster recovery configurations are extremely enticing and in fact I plan on doing a whole blog post on a just that in the near future.

Configure the Cluster

Now that we have the basics in place, let’s get started with the actual configuration of the cluster. You will want to add the Failover Clustering feature to both nodes of your cluster. For simplicity sake, I’ve called my nodes PRIMARY and SECONDARY. This is accomplished very easily through the Add Features Wizard as shown below.

Figure 1 – Add the Failover Clustering Role

Next you will want to have a look at your network connections. It is best if you rename the connections on each of your servers to reflect the network that they represent. This will make things easier to remember later.

Figure 2- Change the names of your network connections

You will also want to go into the Advanced Settings of your Network Connections (hit Alt to see Advanced Settings menu) of each server and make sure the Public network is first in the list.

Figure 3- Make sure your public network is first

Your private network should only contain an IP address and Subnet mask. No Default Gateway or DNS servers should be defined. Your nodes need to be able to communicate across this network, so make sure the servers can communicate across this network; add static routes if necessary.

Figure 4 – Private network settings

Once you have your network configured, you are ready to build your cluster. The first step is to “Validate a Configuration”. Open up the Failover Cluster Manager and click on Validate a Configuration.

Figure 5 – Validate a Configuration

The Validation Wizard launches and presents you the first screen as shown below. Add the two servers in your cluster and click Next to continue.

Figure 6 – Add the cluster nodes

A multi-site cluster does not need to pass the storage validation (see Microsoft article). Toskip the storage validation process,click on “Run only the tests I select” and click Continue.

Figure 7 – Select “Run only tests I select”

In the test selection screen, unselect Storage and click Next

Figure 8 – Unselect the Storage test

You will be presented with the following confirmation screen. Click Next to continue.

Figure 9 – Confirm your selection

If you have done everything right, you should see a summary page that looks like the following. Notice that the yellow exclamation point indicates that not all of the tests were run. This is to be expected in a multi-site cluster because the storage tests are skipped. As long as everything else checks out OK, you can proceed. If the report indicates any other errors, fix the problem, re-run the tests, and continue.

Figure 10 – View the validation report

You are now ready to create your cluster. In the Failover Cluster Manager, click on Create a Cluster.

Figure 11 – Create your cluster

The next step asks whether or not you want to validate your cluster. Since you have already done this you can skip this step. Note this will pose a little bit of a problem later on if installing SQL as it will require that the cluster has passed validation before proceeding. When we get to that point I will show you how to by-pass this check via a command line option in the SQL Server setup. For now, choose No and Next.

Figure 12 – Skip the validation test

The next step is that you must create a name for this cluster and IP for administering this cluster. This will be the name that you will use to administer the cluster, not the name of the SQL cluster resource which you will create later. Enter a unique name and IP address and click Next.

Note: This is also the computer name that will need permission to the File Share Witness as described later in this document.

Figure 13 – Choose a unique name and IP address

Confirm your choices and click Next.

Figure 14 – Confirm your choices

Congratulation, if you have done everything right you will see the following Summary page. Notice the yellow exclamation point; obviously something is not perfect. Click on View Report to find out what the problem may be.

Figure 15 – View the report to find out what the warning is all about

If you view the report, you should see a few lines that look like this.

Figure 16 – Error report

Don’t fret; this is to be expected in a multi-site cluster. Remember we said earlier that we will be implementing a Node and File Share Majority quorum. We will change the quorum type from the current Node Majority Cluster (not a good idea in a two node cluster) to a Node and File Share Majority quorum.

Implementing a Node and File Share Majority quorum

First, we need to identify the server that will hold our File Share witness. Remember, as we discussed earlier, this File Share witness should be located in a 3rd location, accessible by both nodes of the cluster. Once you have identified the server, share a folder as you normally would share a folder. In my case, I create a share called MYCLUSTER on a server named DEMODC.

The key thing to remember about this share is that you must give the cluster computer name read/write permissions to the share at both the Share level and NTFS level permissions. If you recall back at Figure 13, I created my cluster and gave it the name “MYCLUSTER”. You will need to make sure you give the cluster computer account read/write permissions as shown in the following screen shots.

Figure 17 – Make sure you search for Computers

Figure 18 – Give the cluster computer account NTFS permissions

Figure 19 – Give the cluster computer account share level permissions

Now with the shared folder in place and the appropriate permissions assigned, you are ready to change your quorum type. From Failover Cluster Manager, right-click on your cluster, choose More Actions and Configure Cluster Quorum Settings.

Figure 20 – Change your quorum type

On the next screen choose Node and File Share Majority and click Next.

Figure 21 – Choose Node and File Share Majority

In this screen, enter the path to the file share you previously created and click Next.

Figure 22 – Choose your file share witness

Confirm that the information is correct and click Next.

Figure 23 – Click Next to confirm your quorum change to Node and File Share Majority

Assuming you did everything right, you should see the following Summary page.

Figure 24 – A successful quorum change

Now when you view your cluster, the Quorum Configuration should say “Node and File Share Majority” as shown below.

Figure 25 – You now have a Node and File Share Majority quorum

The steps I have outlined up until this point apply to any multi-site cluster, whether it is a SQL, Exchange, File Server or other type of failover cluster. The next step in creating a multi-site cluster involves integrating your storage and replication solution into the failover cluster. This step will vary from depending upon your replication solution, so you really need to be in close contact with your replication vendor to get it right. In Part 2 of my series, I will illustrate how SteelEye DataKeeper Cluster Edition integrates with Windows Server Failover Clustering to give you an idea of how one of the replication vendor’s solutions works.

Other parts of this series will describe in detail how to install SQL, File Servers and Hyper-V in multi-site clusters. I will also have a post on considerations for multi-node clusters of three or more nodes.

MS extending disks 2003/2008R2,2012R2 Storage Space, Storage, Pools, and Clustered environments…

Source: MCPmag

WINDOWS ADVISOR

How To Manage Storage Spaces and Storage Pools in Windows Server 2012

Microsoft delivered a completely new way of looking at our disks and storage in Windows Server 2012, with the biggest change in how storage is laid out and provisioned. Here’s how to create and manage it all.

Windows Server 2008 R2 used the traditional disk management MMC snap-in to manage the disk configuration, as well as the handy DISKPART command-line tool. It is fair to say that the storage subsystem was not exactly optimized for high speed, resilience or large-scale file server operations. So when the Windows Server team designed the new Windows Server 2012, they took a long hard look at storage.

The solution that Microsoft delivered is a completely new way of looking at our disks and storage in Windows Server 2012, with raft of changes in the storage arena. These include SMB 3.0, which opens up a number of exciting new possibilities. The biggest change, though, has been reserved for the layout and provision of the storage itself. The introduction of storage spaces bring with it the ability to provide clustering for high availability and integration with Cluster Shared Volumes for scalable deployments of virtual machines, file shares and other workloads.

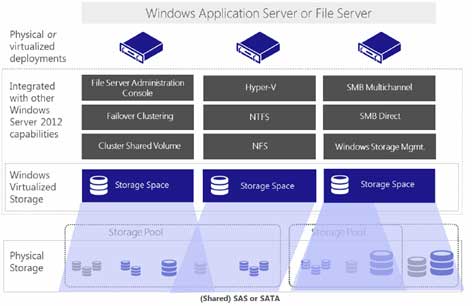
Storage Spaces lets you group industry-standard disks into at least one storage pool. You can then create virtual disks from the available capacity. One of the most useful add-ons when using this technology is that you can thin provision a pool and it can grow as needed.

How Microsoft Achieves All This Disk Trickery 
The concept of a storage pool and a Storage Space is based on taking a bunch of physical disks and creating a virtual single pool of space. This pool is then used to create volumes for our use. Clever!

Storage Pools and Storage Spaces

(Click image to view larger version.)

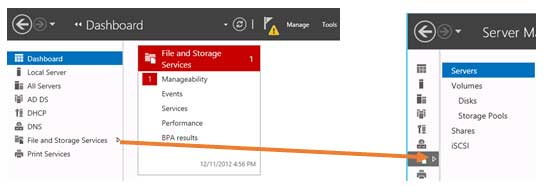
File and storage services is one of the 18 roles within Windows Server 2012 and requires nothing other than a working installation. The server can be a full GUI or the Server Core version. The storage subsystem can be controlled locally, remotely through a GUI or by PowerShell cmdlets:

storage subsystem can be controlled locally, remotely through a GUI or by PowerShell

(Click image to view larger version.)

Server Manager is the place to manage the role. Clicking File and Storage Services opens up the individual management areas:

Server Manager is the place to manage the role.

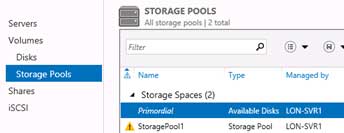
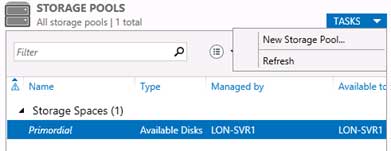
Storage Pools shows the individual storage spaces you have created on the local server or have access to on a remote server. The “primordial” space refers to any physical disks added to the server but not yet added to a storage space. Adding a disk wipes all data from it.

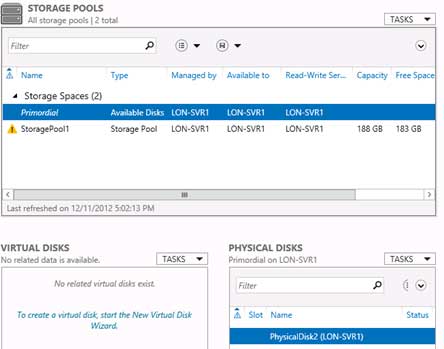
The full pool screen shows details about the storage spaces and the constituent physical disks, as well as any virtual disks already created on it:

storage spaces and the constituent physical disks details

(Click image to view larger version.)

To create a new pool, simply click Tasks then Create New Storage Pool to fire up the wizard:

Click Tasks then Create New Storage Pool

Choose the physicals disks you want to be part of the pool:

Choose the physicals disks

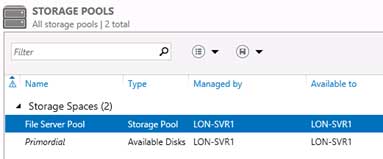
The pool shows up. Note that if you use all physical disks, the primordial space will disappear:

The pool shows up

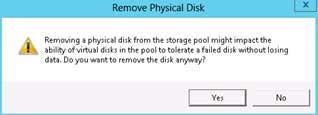
You can remove an individual disk from a pool, but this creates a warning about data loss:

data loss warning

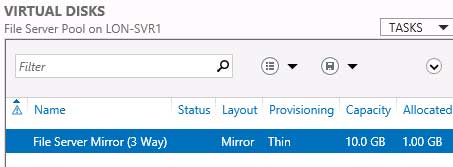
Having created a pool, the next task is to create a virtual disk on which to create our volume. I will create a three-way mirrored disk, although my choices are from simple spanning (or JBOD), Parity (three disks needed) or two- or three-way mirroring (three-way requires at least five disks):

create a virtual disk

(Click image to view larger version.)

Choose resilience type:

Choose resilience type

(Click image to view larger version.)

Choose provisioning type:

Choose provisioning type

(Click image to view larger version.)

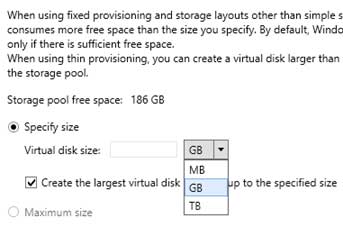
Choose a disk size:

Choose disk size

Choose two- or three-way mirroring:

two- or three-way mirroring

(Click image to view larger version.)

On completion, the wizard creates the mirror:

wizard creates the mirror

(Click image to view larger version.)

Note that although I created a 10GB three-way mirror, only 1GB is allocated at present (thin provisioning). As data is saved, the allocation will increase accordingly:

allocation will increase accordingly

(Click image to view larger version.)

The final step is to create a usable volume on this mirror. This could be a mount point or a drive letter. A new wizard is required.

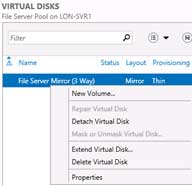
Right-click the new mirrored virtual disk, then select New Volume. Without this, the storage we just created will not be accessible to the operating system or users:

Right-click the new mirrored virtual disk, select New Volume

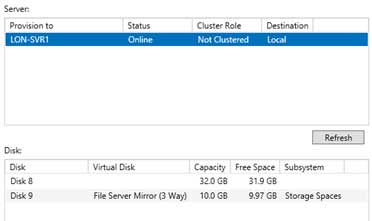
Choose the correct disk (physical or virtual on which you wish to create a volume — note all unallocated physical disks will appear here as well as virtual ones):

Choose the correct disk

Choose the volume size, up to the full size of the virtual disk you created:

Choose the volume size

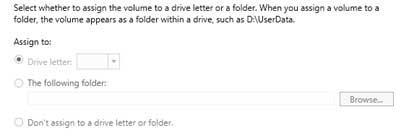
Decide whether the user is going to see a new drive letter or whether you wish to use this volume as a mount point in an empty NTFS folder on another volume:

Decide whether the user is going to see a new drive letter or whether you wish to use this volume as a mount point in an empty NTFS folder on another volume

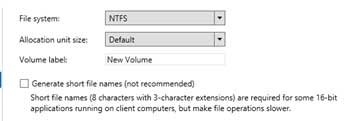
Choose the format of the file system. Options include NTFS and the new Resilient File System:

 NTFS or ReFS

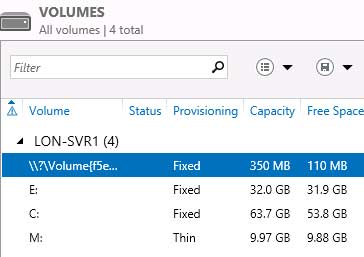
The chosen drive letter now appears in your list of volumes available. Note it is shown as thinly provisioned:

New volume shows up thinly provisioned

In summary
Microsoft has now given us a tool that has huge implications for our local and centralized storage on servers. Small businesses that cannot stretch to Fibre Channel or iSCSI implementations can now provision scalable, resilient systems for clustering, file servers and application usage. All this can be achieved out of the box, with industry-standard cheap storage hardware.

The Mirror and Parity resilience types are pseudo-RAID and will apparently recover even in a totally unrelated system and will auto-recover on a local server when new storage is added. Despite this, I would still only ever trust my data to hardware implemented RAID and then place that in a storage pool — some habits die hard.

The Storage Spaces and storage pool feature within Windows Server is a huge leap forward in Windows Server usability.

About the Author

Ed Baker, MCSE, MCT, is a 20-year IT veteran who specializes in Windows server and client products. Ed teaches for Firebrand Training and the Firebrand Microsoft IT Academy Programme in the UK. 

Source: Cluster Shared Volumes (CSV) – Extending a Volume


There are often times where you have a need to expand a LUN when running enterprise systems.  This is a trivial action in most cases because you simply add physical drives to the array and then use Disk Management to extend the drive to encompass the newly expanded volume.  Unfortunately, on highly-available systems such as those running Failover Clustering with Cluster Shared Volumes (CSV)-enabled features the drive is reserved and un-manageable by Disk Management.  However, this procedure is possible and capable of being done without any loss of service to client services such as virtual machines.

First:  Extend LUN using OEM-specific tools

The first step isn’t one that I can document specifically because it is OEM-specific for the toolset.  As you know, SAN’s are a form of Shared I/O and due to this they are managed using a set of proprietary tools (usually) and as such I can’t really provide guidance because of this.

However, to summarize a bit what you should do is similar to the following steps as I performed on our EMC Clarion AX4-5 using Navisphere Express –

  1. Connect to Navisphere via browser
  2. Click Disk Pools
  3. Click Extend
  4. Provided percentage or size

After extending the LUN, I verified that the LUN was fully extended through the Navisphere client and when completed, I moved to the next step.

Second:  Find the CSV Owner

To find the owner of the CSV, the easiest method is to use the Failover Clustering administration tool.  This can be found on any of the cluster hosts or you can install on your workstation as part of the Remote Administration Tools for Windows 2008 R2.

To determine the CSV owner, do the following:

  1. Click Start, Administrative Tools, Failover Cluster Manager
  2. Connect to the Cluster by clicking Manage Cluster from the MMC action pane
  3. Highlight the Cluster Shared Volumes node, and locate the server name under Current Owner

image

This server name will be used in Step 3.

Third:  Remote Desktop (RDP) to CSV Owner Server

CSV’s are a tricky “volume” unlike many seen in the past.  The entire LUN is presented to all hosts in the cluster; however, the lock for each server is done at the folder level rather than the traditional LUN level.  This allows n number of hosts to all connect to a LUN but only own the applications contained in the folders they utilize.  Beyond that, the drives that are managed in Disk Management are set as reserved and un-manageable using the UI hence causing trickiness.  Using the information determined in Step 2, let’s RDP to the server.

To RDP to the server, just use mstsc /v:{server FQDN}

Fourth:  Use DiskPart to Extend Volume

The last step, now that you are at the server who owns the CSV, is to execute DiskPart and issue the command to start the extend process.  To do this, you do the following –

  1. Run DiskPart from an elevated command prompt
  2. Type rescan
  3. Type list volume
  4. Type select volume {enter volume number from output from #3 step}
  5. Type extend

To confirm that all changes were taken and that the volume is the correct size, you can do the the list volume command again and verify the size change from step 3 above.

Summary

In this post, we focused on a scenario where you’ve “outgrown” your planned capacity and you now need to extend your CSV-based volume.  Unfortunately, the traditional methods of extending the size of a drive isn’t capable of being used due to the tools (Disk Management) disabling the functionality.  The next challenge, though, is finding the volume with DiskPart and the trick here is to find the CSV owner and execute the toolset from this server.  After doing this, your LUN should extend to the size you provisioned in your OEM-specific tool.

Thanks,

It is fully supported to extend a Windows Disk ONLINE as of Windows 2008

Microsoft CSS team have recently updated KB304736 to explicitly confirm and support online disk extension on Windows 2008 and Windows 2008 R2.  In many cases online Windows extension will also work on Windows 2003 Service Pack 2 x64 Edition.

Here is a summary of the capabilities of Windows 2008 or higher

  1. Both Local disks and Shared Cluster disks can be extended Online
  2. Almost every modern SAN supports extending LUNs online, allocating this new space at the end of the disk and presenting this information to Windows
  3. The word “Online” means that the end-to-end service is preserved.  A disk may be extended with the cluster running, SAP & SQL Server running and on the system is on high load.  There is no necessity to wait for a period of low activity, though some customers choose to time such operations off peak
  4. Windows supports several kinds of disks.  MBR Disks are limited to 2TB in size.  In general GPT disks are recommended.
  1. Both Basic Disks and Dynamic Disks can be extended online.  Dynamic Disks are not supported in a Windows Cluster, but there is no real use for Dynamic Disks with SQL Server Clusters. This blog explains the background on Basic and Dynamic Disks.
  2. Windows 2008 & Windows 2008 R2 offer a simple way to extend a disk through the Disk Management GUI.  A command line tool diskpart.exe can also be used
  3. Windows allows for both extending and shrinking a disk (though we seldom find customers who need to shrink disks)

Windows 2003 based systems can usually extend a disk online.  Extending a disk on Windows 2003 needs testing prior to executing in a production environment.  This is because of the age of the Windows 2003 product and the fact not all drivers and components support online disk extension.  It is best to check with the SAN vendor and/or to test with the applications shutdown first.

2003 OS storage expansion in clustered setup

Source: Extending cluster storage

A question recently came in on the bloghotline from a customer who asked about implementing scalable storage on server clusters and how to avoid downtime when storage needs to be extended. One of our cluster PMs, Elden Christensen, replied as follows:

. . . . . . . . . . . . . . . . . .

In regards to the ability to dynamically increase volume sizes to eliminate downtime, this can be accomplished today on Windows Server 2003 with basic volumes using the DiskPart utility. After dynamically extending the LUN size in the storage cabinet, you can use this utility to extend the volume size. See the DiskPart Help on the web for the DiskPart syntax. Diskpart is available as a download utility for Windows 2000 and is included in the product in Windows Server 2003.

You can also use Diskpart on Failover Cluster volumes to dynamically extend volumes with no down time.  Here’s a KB that discusses how to use Diskpart on clusters: 304736 How to extend the partition of a cluster shared disk.

You can also use dynamic disks to create spanned volumes, where a volume can be dynamically extended to all another separate physical LUN, and extend the single logical volume over multiple LUN’s.

Note that dynamic disks are not natively provided in the core Windows Server operating system for failover clustering. Support can be added by purchasing the Storage Foundations product by Symantec. Here is a KB article with details: 237853 Dynamic Disk Configuration Unavailable for Server Cluster Disk Resources.

An important distinction between Dynamic Disks and DiskPart is that Diskpart can be used to extend a partition on an already existing LUN where the size of the existing LUN has been increased. Diskpart is not used to span a volume over multiple disks/LUN’s.

Another option is that additional storage capacity can be added and preserve the single name space for users by using volume mount points (also called mounted drives).  With mount points, volumes are mounted under directories, such as D:MarketingPresentations. Users access Marketing as they are used to, but the Presentations directory can actually reside on a separate volume/disk.  This allows you to increase storage capacity without impact to users.

You can also create volume mount points on clusters, here’s an article that discusses how to do that: 280297 How to configure Volume Mount Points on a clustered server.

I have outlined several ways that you can dynamically increase storage capacity on the fly with no down time today with Windows.  I hope you find this helpful.

–Elden

How to extend the partition of a cluster shared disk: MS Q304736 Repost

Source: MS Q304736

This article describes how to add additional storage capacity to a cluster if the underlying hardware RAID supports “capacity extension” technology. Capacity extension provides the ability to add additional drives to an existing RAID set and extend the logical drive so that it appears as free space at the end of the same logical drive. You can use the Diskpart.exe command-line utility to extend an existing partition into free space. This process has the following requirements:

  • The additional disk space must appear as free space at the end of the existing drive, and it must be directly behind the existing volume that is to be extended.
  • The extension must not rely on software fault tolerance to combine the existing partition and free space.
  • The disk signatures of the existing drive remain the same.
  • Use of the Physical Disk Resource type for the disk. If the disk resource is provided by a third-party manufacturer, you must contact that manufacturer for information about how to increase disk space.

MPORTANT: If you add an additional drive to an existing array and the new drive appears as a new logical disk (instead of free space at the end of the existing drive), the hardware does not support capacity extension because it refers to the free space as a new drive, and the following procedure will not work. Some storage hardware will, by default, automatically create a new logical disk and volume for the new space despite the fact that the expansion of the existing logical disk is a possible option. When you are using server clusters of Windows Server 2003 or failover clusters of Windows Server 2008 or of Windows Server 2008 R2, software fault tolerance is not natively supported, and the creation of a spanned volume (Volume Set) is not a viable option. To add additional space: 

  • Create a second physical disk resource.
  • Delete and then re-create the array with the additional disk, and then replace the disk by using the instructions that are included in the following Microsoft Knowledge Base article:
305793 How to replace a disk that is on a Windows 2000 or a Windows 2003 Server cluster

How to Extend an Existing Drive into Free Space if the Hardware Supports Capacity Extension

You can perform an online extension or an offline extension of a data volume.

How to perform an online extension of a data volume

You can perform an online extension of a cluster data volume in Windows Server 2008 or in Windows Server 2008 R2 without stopping the cluster application(s). However, not all vendor specific applications, drivers and utilities for Windows Server 2003 fully support transparent online extension of cluster volumes. Therefore, we recommend that you test the specific hardware environment and hardware configuration to confirm that it will behave correctly before you perform the online extension in Windows Server 2003. 

To perform an online extension of the disk partition, follow these steps:

  1. Add the additional physical drives and extend the additional disk or disks as free space by using the instructions that are included with the hardware vendor documentation.
  2. Open the Disk Management snap-in, verify that the new free space is added to the end of the proper drive.
  3. Right-click the existing partition, and then click Properties. On the General tab, type a unique name for the partition. This name will be used to identify the partition that you want to extend. 

    Note If you encounter any problem with the previous steps when you are extending the drive, contact your hardware vendor for assistance.

  4. Extend the partition by using one of the following methods:
    • Use the Disk Management snap-in in Windows Server 2008 R2

      To extend the partition by using the Disk Management snap-in, follow these steps:

      1. In Disk Management, right-click the data volume that you want to extend.
      2. Click Extend Volume…. .
      3. Follow the instructions in the Extend Volume Wizard.

      Note Windows Vista and Windows Server 2008 does not allow Disk Management snap-in to Extend volume and user should use diskpart to extend volume instead.

    • Use the Diskpart.exe utility

      To extend the partition by using the Diskpart.exe utility, follow these steps:

      1. Open a command prompt, type diskpart, and then press ENTER.
      2. At the DISKPART prompt, type list volume , and then press ENTER to display the existing volumes on the computer.
      3. At the DISKPART prompt, type select volume <volume number>, and then press ENTER. Here volume number is the number of the volume that you want to extend. The volume has the unique name that you created in step 3. The volume is listed in the output of the list volume command.
      4. At the DISKPART prompt, type extend, and then press ENTER to extend the partition into all of the available disk space to the end of the drive. Or, type extend size=<size> to extends the selected volume by sizemegabytes (MB).
      5. Type exit, and then press ENTER to exit the command prompt.

How to perform an offline extension of a data volume

 To perform an offline extension of the disk partition in Windows Server 2003 , follow these steps:  

  1. Back up the shared disk (or disks) that you want to extend.
  2. Power off all but one node in the cluster.
  3. Take the entire group that the physical disk resource is located in offline. Bring only the physical disk resource that is to be extended online. This process should close all open handles to the disk.

    Note If you have any disk or Host Bus Adapter (HBA) utilities that access the disk, you may need to quit them or stop the services so that they will release any handles to the disk.

  4. Add the additional physical drives and extend the additional disk or disks as free space by using the instructions that are included with the hardware vendor documentation.
  5. Open the Disk Management snap-in, verify that the new free space is added to the end of the proper drive.
  6. Right-click the existing partition, and then click Properties. On the General tab, type a unique name for the partition. This name will be used to identify the partition that you want to extend. Exit Disk Management snap-in. 

    Note If you encounter any problem with the previous steps when you are extending the drive, contact your hardware vendor for assistance.

  7. Open a command prompt, type diskpart, and then press ENTER.
  8. At the DISKPART prompt, type list volume , and then press ENTER to display the existing volumes on the computer.
  9. At the DISKPART prompt, type select volume <volume number>, and then press ENTER. Here volume number is the number of the volume that you want to extend. The volume has the unique name that you created in step 6. The volume is listed in the output of the list volume command.
  10. At the DISKPART prompt, type extend, and then press ENTER to extend the partition into all of the available disk space to the end of the drive. Or, type extend size=<size> to extends the selected volume by size megabytes (MB).
  11. Type exit, and then press ENTER to exit the command prompt.
  12. Now that the volume is extended, you can bring the entire group that contains the physical disk resource online, and then power up all of the other nodes in the cluster.
  13. Verify that the group can come online and failover to all other nodes in the cluster.

THE DISK IS OFFLINE BECAUSE OF POLICY SET BY AN ADMINISTRATOR

Note from Tanny:

This post did not work, but is worth sharing…. in my case it was a matter of just bringing the storage resource online in the cluster resource manager.

For a 2008R2 Clustered environment, take look at the cluster resource manager.
In my case it was a matter of bring the storage resource on line.  We swing a LUN from different servers for quick backups and restores.  The instructions did not work, but usually after presenting the LUN to the Cluster or any of the stand alone environments, a quick scan will bring the disk online and keep the previous drive letter.

Source: (Repost from the Happy SysAdm Blog)The disk is offline because of policy set by an administrator

You have just installed or cloned a VM with Windows 2008 Enterprise or Datacenter or you have upgraded the VM to Virtual Hardware 7 and under Disk Management you get an error message saying:
“the disk is offline because of policy set by an administrator”.
This is because, and this is by design, all virtual machine disk files (VMDK) are presented from Virtual hardware 7 (the one of ESX 3.5) to VMs as SAN disks.
At the same time, and this is by design too, Microsoft has changed how SAN disks are handled by its Windows 2008 Enterprise and Datacenter editions.
In fact, on Windows Server 2008 Enterprise and Windows Server 2008 Datacenter (and this is true for R2 too), the default SAN policy is now VDS_SP_OFFLINE_SHARED for all SAN disks except the boot disk.
Having the policy set to Offline Shared means that your SAN disks will be simply offline on startup of your server and if your paging file is on one of this secondary disks it will be unavailable.
Here’s the solution to this annoying problem.
What you have to do is first to query the current SAN policy from the command line with DISKPART and issue the following SAN commands:
= = = = = = = = = = = = = = = = = =
DISKPART.EXE
 
DISKPART> san
 
SAN Policy : Offline Shared
= = = = = = = = = = = = = = = = = =
Once you have verified that the applied policy is Offline Shared, you have two options to set the disk to Online.
The first one is to log in to your system as an Administrator, click Computer Management > Storage > Disk Management, right-click the disk and choose Online.
The second one is to make a SAN policy change, then select the offline disk, force a clear of its readonly flag and bring it online. Follow these steps:
= = = = = = = = = = = = = = = = = =
DISKPART> san policy=OnlineAll
 
DiskPart successfully changed the SAN policy for the current operating system.
DISKPART> LIST DISK
 
Disk ### Status Size Free Dyn Gpt
——– ————- ——- ——- — —
Disk 0 Online 40 GB 0 B
* Disk 1 Offline 10 GB 1024 KB
 
DISKPART>; select disk 1
 
Disk 1 is now the selected disk.
 
DISKPART> ATTRIBUTES DISK CLEAR READONLY
 
Disk attributes cleared successfully.
 
DISKPART> attributes disk
Current Read-only State : No
Read-only : No
Boot Disk : No
Pagefile Disk : No
Hibernation File Disk : No
Crashdump Disk : No
Clustered Disk : No
 
DISKPART> ONLINE DISK
 
DiskPart successfully onlined the selected disk.
= = = = = = = = = = = = = = = = = =
Once that is done, the drive mounts automagically.
  1. So, I’m trying all this but the return message I get in disk part is “DiskPart failed to clear disk attributes.”. Any further advice?

    DISKPART> san policy=OnlineAll

    DiskPart successfully changed the SAN policy for the current operating system.

    DISKPART> rescan

    Please wait while DiskPart scans your configuration…

    DiskPart has finished scanning your configuration.

    DISKPART> select disk 1

    Disk 1 is now the selected disk.

    DISKPART> attributes disk clear readonly

    DiskPart failed to clear disk attributes.

    DISKPART> attributes disk
    Current Read-only State : Yes
    Read-only : Yes
    Boot Disk : No
    Pagefile Disk : No
    Hibernation File Disk : No
    Crashdump Disk : No
    Clustered Disk : Yes

    DISKPART> san

    SAN Policy : Online All

    (Note from Tanny take a look at the Cluster resource manager and bring storage resource online)

  2. I see you problem. Have you checked that you have full access to the volume you want to change attributes for? Is it a cluster resource? I think so because your log says “clustered disk: yes”. In this case you should stop all nodes but one and then you will be allowed to use diskpart to reset the flags. The general idea is to grant the server you are connected to write access to the volume.
    Let me know if you need more help and if, so, please post more details about you configuration (servers and LUNs).
    Regards

    Reply

  3. I am having this same problem. It is in cluster and I have shut down the other node. I am still unable to change the read only flag.
    Please help?!

  4. Wacky problem – a SAN volume mounted to a 2008 (not R2) 32bit enterprise server had been working fine. After a reboot of the server, the disk was offline. Putting it back online, no problem, diskpart details for the volume show “Read Only: No”. Got support feom Dell and foud the the Volume was listed as Read Only. Simple fix, change the Volume to “Read Only: No” with Diskpart. 4 hours later, the Volume is marked as “read only” again.No chnages made by us, nothing in the Windows logs.
    The disk is an Dell/Emc SAN LUN, fiber connected, exclusive use to this machine. Have another LUN, almost the same size attached the same way to this machine, no problems with that. Appreciate any thoughts or places to look.

    Reply

  5. Ahhh, nice! A perfect tutorial! Thanks a lot!

    Reply

  6. Great article! I just spent 2 hours trying to figure out why my san disks weren’t showing and this was the fix.

    Thank you!

    Reply

  7. Thank you, thank you, thank you! This article helped me with an IBM DS3000 and an IBM System x3650M3 Windows Server 2008 R2. Thumbs up to you! I’d be still trying to figure why I couldn’t configure these drives!

    Reply

  8. These settings are good for window server 2008 R1 and R2. It breaks again with R2 SP1 ;-(. Is there any solution for R2 SP1?

    Reply

  9. Thanks. Very helpful.

    Reply

  10. Wonderful article..thanks a lot dude!!

    Reply

  11. This worked perfectly for me. I tried figuring it out on my own but just couldn’t get it to work within VMware Workstation.

    Reply

  12. let me know i how to remove is read only attribute and bring online. if i access san directly then it possible.
    i have two server in one server its show online but in second server its display reserved the disk offline message.

    I’m also trying all this but the return message I get same problem in disk part is “DiskPart failed to clear disk attributes.”. Any further advice?

    DISKPART> san policy=OnlineAll

    DiskPart successfully changed the SAN policy for the current operating system.

    DISKPART> rescan

    Please wait while DiskPart scans your configuration…

    DiskPart has finished scanning your configuration.

    DISKPART> select disk 1

    Disk 1 is now the selected disk.

    DISKPART> attributes disk clear readonly

    DiskPart failed to clear disk attributes.

    DISKPART> attributes disk
    Current Read-only State : Yes
    Read-only : Yes
    Boot Disk : No
    Pagefile Disk : No
    Hibernation File Disk : No
    Crashdump Disk : No
    Clustered Disk : Yes

    DISKPART> san

    SAN Policy : Online All

    Reply

  13. Exactly the answer I was looking for!

    Reply

  14. Well done – fixed me right up.

    Reply

  15. Perfect answer for a vexing problem. I had no clue where to look for

    Reply

  16. This is really helpful article ! Many Thanks.

    Reply

  17. Thanks for your reply!

  18. Thanks, this was very helpful for me.

    Reply

  19. Hi same problem here, the disk says its a clustered disk but i don’t have it in the Failover cluster manager. Its just a dedicated disk to one server from the san.. have cleared simultaneous connections and only one server is connected now but still won’t come online. Any help would be great.
    Thanks

    Reply

  20. Anonym

HP SYSTEM MANAGEMENT HOMEPAGE SHOWS NO ITEMS

Source: Exit The Fast Lane

If you’ve installed the Proliant Support Pack (8.x) after the fact, or built a new server with SmartStart and did not enable SNMP then you’ve probably seen this after the install:

 
All of the HP agents are started and reporting “all is well” but no specific component information is displayed. This is because the Management Homepage relies on SNMP which is either not installed or not configured properly. Even if you don’t have an enterprise SNMP trap receiver you need to configure the service on the local server to send updates to itself, at least. First ensure that the SNMP service is installed then open it’s properties. On the Traps tab enter a community name of your choosing, the typical names are “public” and “private”, public being read-only and private being read-write. Make sure that the loopback address is added to the trap destinations area. On the Security tab enter the community name you just created in the accepted community names box and set its permissions to READ WRITE. Ensure that traps sent from the localhost are allowed to be received. Restart the SNMP service which will also restart all of the HP management agents.


Launch the System Management Homepage again and it should look more like this:


Another unfortunate scenario in which this issue can arise is when you have installed an unsupported OS on a given server platform. For instance, Server 2008 R2 on a DL380 G4. In this case many of the PSP components will not be installed and therefore will not work correctly.
40 comments :
  1. Thanks for the info, solved the same problem for me.

    Reply

  2. Thanks – Great post, but no luck resolving this one for me.

    The only difference I get is that my SNMP service is NOT dependant on the HP services, therefore they don’t restart when I restart SNMP service.

    Perhaps, they’re still not talking to each other properly. Any one got any thoughts on what to do?

    Mick

    Reply

  3. The HP services are dependent on the SNMP service. These are:

    HP Foundation Agents
    HP NIC Agents
    HP Insight Server Agents
    HP Insight Storage Agents

    A couple of things you could try. You could manually create the dependencies in the registry by adding SNMP to the “DependOnService” key for each HP required service. This will at least ensure that SNMP is fully started before the HP services start.

    You might also re-install the PSP and force the updates to install over what is installed already. With SNMP already installed/started whatever associations are missing should be created.

    Peter

    Reply

  4. Thanks for sharing this information, this solved this issue for me too although SMTP wàs running!

    Reply

  5. Ensure you have the management agents installed.

    Reply

  6. In my case, when installing the proliant support pack on a windows 2008 R2 64bit Server failed with missing dependencies. Namely the Enhanced System Management Controller driver and Ilo Advanced driver.
    Since I could not find the 64bit R2 Version driver, I ended up installing the 2008 64bit Version. It worked when I started the install with the Windows 2008 SP1 compatibility. After that I was able to install the Proliant Support pack successfully, and the system homepage showed all items.

    Reply

  7. You the man. Saved me a few hours trying to figure this out on my own. Muchos gracias

    Reply

  8. Worked a charm thanks for sharing

    Reply

  9. To whoever posted:

    “In my case, when installing the proliant support pack on a windows 2008 R2 64bit Server failed with missing dependencies. Namely the Enhanced System Management Controller driver and Ilo Advanced driver.
    Since I could not find the 64bit R2 Version driver, I ended up installing the 2008 64bit Version. It worked when I started the install with the Windows 2008 SP1 compatibility. After that I was able to install the Proliant Support pack successfully, and the system homepage showed all items”

    Thank you, thank you, thank you!! Just wish I’d found this post 3 hours and about 20 (very very slow) HP downloads earlier 😉

    Reply

  10. Thank you for the post. Worked perfect.

    Reply

  11. Thank You VERY MUCH! Not much out there on this fix… saved me probably another hour of searching.. Big Beer for you!

    Reply

  12. Worked for me, thanks.

    Reply

  13. Thaaaank You!!!!!!!!!!!!!!!!!!!!!!

    Reply

  14. Many thanks. Saved additional hours of hair pulling.

    Reply

  15. “Another unfortunate scenario in which this issue can arise is when you have installed an unsupported OS on a given server platform. For instance, Server 2008 R2 on a DL380 G4. In this case many of the PSP components will not be installed and therefore will not work correctly.”

    So, is there any way at all to get HP Insight to work on a DL380 G4 with 2008 R2?

    Reply

  16. Cheers dude worked a treat for me!

    Reply

  17. Great post, thanks for your help.

    Reply

  18. Worked perfect thanks!

    Reply

  19. Thank you very much!

    Reply

  20. Thanks!

    Reply

  21. Very clear and helpful, thanks!

    Reply

  22. Adding my thanks. I reckon I expected the installer to notify me of any missing dependencies (I did not have SNMP installed)…

    Reply

  23. If you’re useing Linux as your preferred OS and you’re expecting the same issue, try the following:

    1. /etc/init.d/hp-snmp-agents [re]start
    2. /etc/init.d/snmpd [re]start
    3. cpqacuxe -stop && sleep 5 && cpqacuxe –enable-remote

    Make sure you’re /etc/snmp/snmpd.conf is correct.

    Best regards

    Reply

  24. Thanks for the info, very useful 🙂

    Reply

  25. Cheers big ears

    Reply

  26. FAB – Great. Save me loads of time tracking this down. Thanks Muchly.

    Reply

  27. worked great, thanks!

    Reply

  28. it worked for me, thanks.

    Reply

  29. Brilliant…

    Reply

  30. Thanks that worked great!!

    Reply

  31. Thanks it worked for me as well

    Reply

  32. Steven @ June 28, 2012 3:52 AM

    Any chance you might explain or show an example of a ‘correct’ snmp.conf?

    Reply

  33. Just adding my thanks as well. It’s best to use the smartstart cd to assist you in installing the windows OS, but my ML350 Gen8 didn’t come with any CD/DVD’s except documentation, which I did not read (oops).

    Reply

  34. I have solved the problem following your instruction. Thanks

    instructing you for Security systems

    Reply

  35. Thanks Sir this information, this solved this issue for me too although SMTP wàs running!

    Really great tip.

    Reply

  36. THANKS … A LOT

    Reply

  37. Hi,

    in my case i have already configured SNMP trap for NOC server. but HP system management home page doesnt show any details. its fully blank.

    as per above screenshot i have configured and check the same. no luck. please anyone help me out on this case

    Reply

  38. it worked for me, thanks.

    Reply